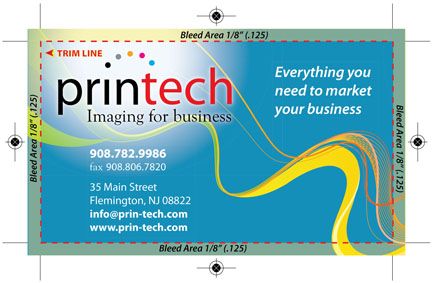
Create a PDF with BLEEDS

If you are creating artwork that will print right to the edge of the page it is called a bleed. A bleed means the image must extend beyond the crop marks. In order to print properly to size your final PDF page size MUST contain a 1/8” bleed on all sides, be cropped to exact bleed size and be of print quality.
Follow these tips for creating a proper PDF with bleeds.
You probably already know how to create a print-ready PDF. Creating a
PDF that bleeds reqiires a few more steps.
Theses simple guidelines below will help to create a PDF with bleeds. Instructions for saving your document as a PDF can vary.
The following are the most popular design software instructions below.
INDESIGN: If you are working in InDesign, it is simple enough to add a .125” bleed. If starting a new document make sure all your options are showing by clicking the “more options” button. Look for Bleed and Slug at the bottom of the menu. In the bleed section type in .125” in the Top, Bottom, Inside and Outside selections.
If you already created your document it is easy to go back to your document settings and add the bleed. Just go to File / Document Settings and look for the Bleed and Slug options. Again if they are not showing, just click the “More Options” button.
When you have finalized your file, go to File / Print. Select Adobe PDF as your printer.
Change the following settings:
Setup – Page size should be set to custom, page position should be set to centered.
Marks and Bleeds – The ONLY things that should be selected here is “Use document bleed settings”
Output – Use composite CMYK. All spot colors and PMS colors should be converted to process CMYK.
Click on the setup button at the bottom of this window to update your adobe PDF settings. Click OK to continue and then select your Adobe PDF printer. Click the preferences button. Default settings should be set to High-Quality or Print.
Click ok and then print. To save this setting for future use, click the “save preset” button at the bottom of the window and call it “Print PDF”. This preset will work with any bleed or non-bleed print document. Click PRINT to create your final print PDF complete with bleeds.
QUARKXPRESS: Quark works a little different in that your bleed is added when you create your PDF and not when you create your document. Once your document is designed, go to File / Print. Select Adobe PDF as your printer. Click on Marks: centered. Click on the bleed tab and select “Symmetric” under Bleed Type. Amount should be set at .125”.
Before hitting the Print button, click on the “Properties” button to adjust your PDF settings.
Default settings should be set to High-Quality or Print. Click the Layout tab and ensure your orientation is correct. Click the advanced button and also make sure your page size is consistent with your bleed selection. Click OK and then PRINT.
OTHER: Other software such as Microsoft Word does not allow you to enlarge your document size for bleeds. It is not recommended to use Microsfot Word to create a printing project. However, if you already have done so Here is a “work around” Allow enough of a margin to accommodate your trim size as well .125” bleed &. request that your PDF be printed at (102%. for word documents). Always request a print proof to review your final product. Always test check your final PDF. If you see white space, your bleed is not correct. Having problems? Send us your original files and we will create your bleedable PDF for print for an additional fee.
OVERSIZE PDF: Other software such as Microsoft Publisher allows you to create an oversized document but will only allow you to print on 11x17 page size. Create your print-ready oversize PDF as you normally would. Open your PDF document containing your bleed plus extra white space to accommodate the larger page size. Go to Tools / Advanced Editing / Crop Tool. Select your area to crop and double click the selected crop area. A window will open to enter exact crop dimensions. Calculate your page size, minus your actual bleed size and divide that in half to get exact dimensions for your crop. In another words, if your finished document will be 8.5” x 11”, then you bleed will be set at 8.75” x 11.25”. When printed on an oversize of 11” x 17” you will have 2.25” of extra space on both sides and 5.75” of space, top and bottom. Divide both in half and your trim should be 1.125” on left, 1.125” on right, 2.875” on top and 2.875” on bottom. Make sure “All” is selected in your page range, then click OK. This ensures your document prints correctly, whether in booklet form, multiple up, saddle stitched, etc.

